Build and Debug Postgres using VS Code on a Mac
In this post, we will see how to build Postgres from the source code and debug it to trace through a simple query execution using Visual Studio Code in a M1 Mac.
Dependencies
Before starting make sure all the dependencies are installed. We will need,
- Git
- GCC compiler
- make
- VS Code
Build and Install Postgres
- First we have to get the source code, we can clone the official Git repo,
git clone https://git.postgresql.org/git/postgresql.gitThere is also a mirror of the repository in Github. We can use any one of these, it would be fine.
- After cloning the repo, cd into the folder ‘postgresql’. We can either build from the master branch or a release-specific branch.
For example, to build Postgres 14, we have to switch to ‘REL_14_STABLE’ branch.
git checkout REL_14_STABLE && git pull - To configure the build, run the following command,
./configure --prefix=$HOME/postgres/pg14 --enable-cassert \ --enable-debug CFLAGS="-ggdb -O0 -fno-omit-frame-pointer" CPPFLAGS="-g -O0"- prefix - folder where Postgres will be installed
- enable-cassert - Enable C Assert statements
- enable-debug - Enable Debug mode in build
- CFLAGS - C compiler flags
- -O0 - disable optimisation
- -g - generate debug symbols
- CPPFLAGS - C++ compiler flags I have given postgres/pg14 folder under my HOME directory as installation location for this Postgres build.
- ‘configure’ script will do a few checks and configure the build, the output should end with something like
config.status: linking src/include/port/darwin.h to src/include/pg_config_os.h config.status: linking src/makefiles/Makefile.darwin to src/Makefile.port
-
‘configure’ would have created a ‘Makefile.global’ under ‘src’ directory, we need to check and make sure optimisations are disable, debug symbols are enabled in the build. Open
src/Makefile.globalfile and check CFLAGS and CPPFLAGS variables to see if they have-gand-O0flags. -
Run
make && make installto run the build and install the outputs to installation directory ($HOME/postgres/pg14) - After
make && make installsucceeds, go to installation directory and check if the build has debug symbolscd $HOME/postgres/pg14/bin nm -pa ./postgres | grep OSOnmis used to list the symbol table names in a binary. For PG14, nm returned around 747 entires. If you do not find any symbol table entries, or the entries are low, make sure you disabled optimisation in Makefile. If you missed it, add-O0in Makefile.global, runmake cleanand then repeatmake && make install - Initialize a PGDATA folder for the database using
initdb, I’m using$HOME/postgres/pgdataas my data directory,$HOME/postgres/pg14/bin/initdb -D $HOME/postgres/pgdataYou should an output similar to this,
Success. You can now start the database server using:
/Users/me/postgres/pg14/bin/pg_ctl -D /Users/me/postgres/pgdata -l logfile start
- (Optional) You can now edit and customize the
postgresql.conffile. I usually change the postgres port to 5433 so that I can keep running a normal non-debug database at 5432 for other purposes.code $HOME/postgres/pgdata/postgresql.conf - Now we can start the Database,
$HOME/postgres/pg14/bin/pg_ctl -D $HOME/postgres/pgdata -l logfile startWe should see this output,
waiting for server to start…. done
server started - We can create a db and login run a simple query.
$HOME/postgres/pg14/bin/createdb -p 5433 sample
$HOME/postgres/pg14/bin/psql -p 5433 sample
We should be logged into the psql console now, we can try to create a sample table an run some queries.
create table hello(id int, message text);
insert into hello values(1, 'Hello world!');
select * from hello;
Debug Postgres in VS Code
Now that we have a running postgres server, lets start debugging it.
-
Open the Postgres source code in VS code and create a launch.json file.
- Add launch configuration to attach to the postgres process, for example
{
 // Use IntelliSense to learn about possible attributes.
 // Hover to view descriptions of existing attributes.
 // For more information, visit: https://go.microsoft.com/fwlink/?linkid=830387
 "version": "0.2.0",
 "configurations": [
     {
         "name": "(lldb) Attach DB",
         "type": "cppdbg",
         "request": "attach",
         "program": "${env:HOME}/postgres/pg14/bin/postgres",
         "MIMode": "lldb",
         "targetArchitecture": "arm64"
     },
 ]
}
Make sure the
targetArchitectureis set to arm64 for M1 macs.programmust point to thepostgresbinary underbin/in our installation directory. - Now login to the database via psql in a terminal and find the postgres backend Process ID. Keep this terminal open for later use,
$HOME/postgres/pg14/bin/psql -p 5433 sampleselect pg_backend_pid();pg_backend_pid() is a system function that returns the process id of the postgres backend for the current session.
pg_backend_pid
—————-
11340
(1 row) -
Create a breakpoint in any function, I use
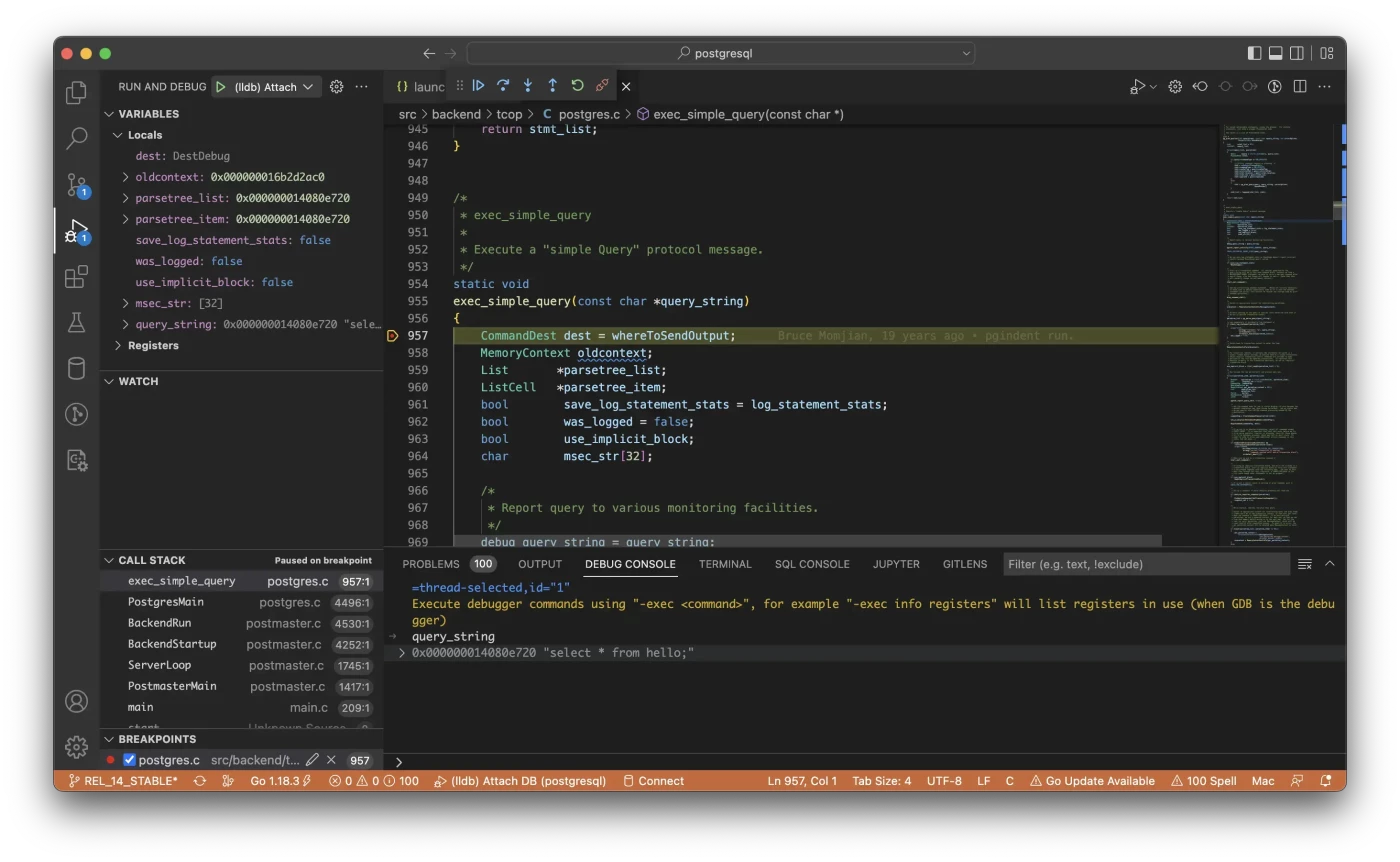
exec_simple_queryinsrc/backend/tcop/postgres.cthis is where the query execution starts. -
Now, Start Debugging (Press
F5orRun and Debug->(lldb) Attach DB), it will ask for a pid, paste the pg_backend_pid that we got from the psql terminal. - Once debugger is ready, go back to the same
psqlterminal and run a SQL query, likeselect * from hello;The VS code breakpoint will get triggered now, from here you can view the variables and do normal step debugging

Thats it we can trace the flow of query execution within Postgres. Let me know in the comments if you face any issue.
In the next post, we will see the various stages of query execution in postgres and its internal workings.